Python OpenCV - cv2.filter2D() - Image Filtering - 2D Convolution
Python OpenCV - cv2.filter2D()
Image Filtering is a technique to filter an image just like a one dimensional audio signal, but in 2D.
In this tutorial, we shall learn how to filter an image using 2D Convolution with cv2.filter2D() function. The convolution happens between source image and kernel.
Kernel is another array, that is usually smaller than the source image, and defines the filtering action. A kernel could be a high pass, low pass, or a custom that can detect certain features in the image.
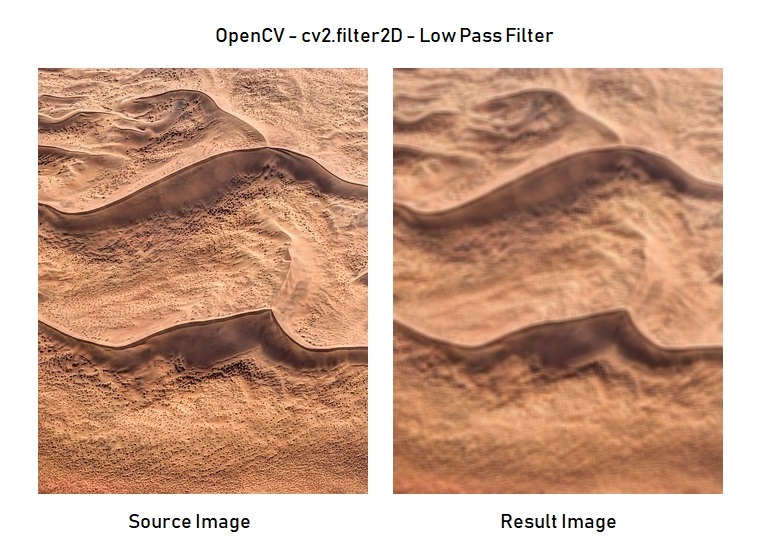
A Low Pass Filter is more like an averaging process. But with the weights and span of averaging depending on the shape and contents of the kernel.
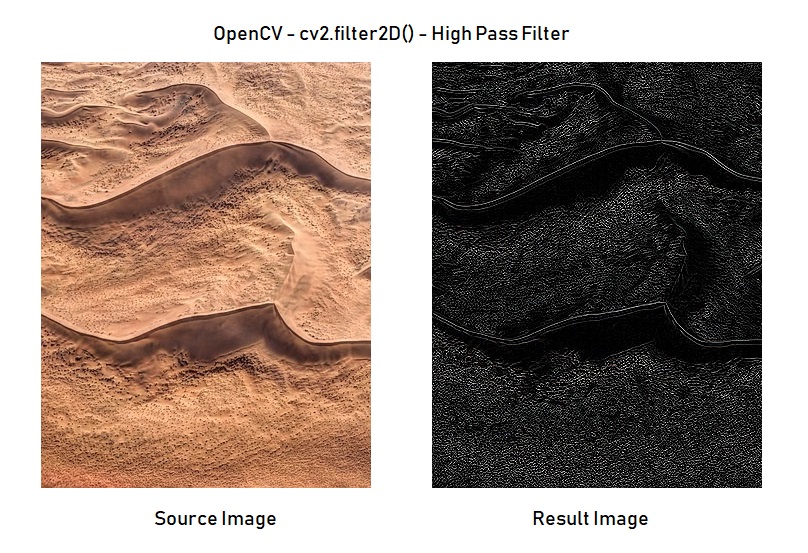
A High Pass Filter is like an edge detector. It gives a high when there is a significant change in the adjacent pixel values.
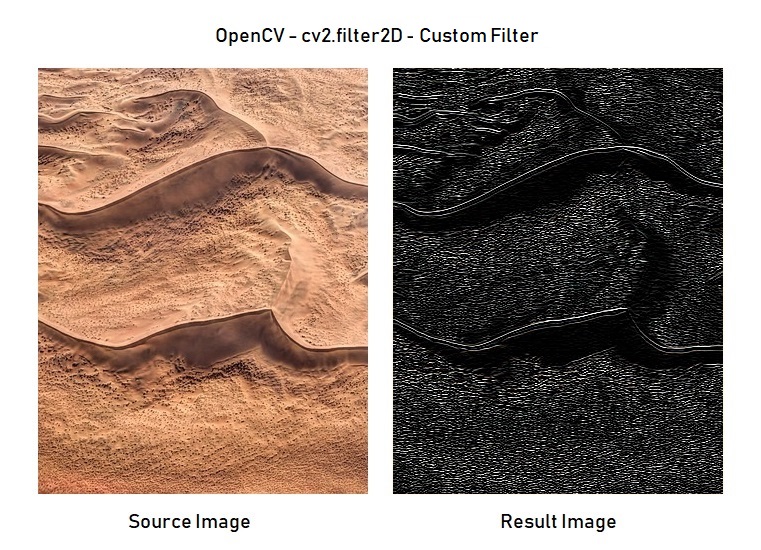
Also, you can use a custom filter, to detect circles, squares or some custom shapes you would like to detect in the image.
Note: Each value in the kernel acts on a single pixel during an operation.
Examples
1. OpenCV Low Pass Filter with 2D Convolution
In this example, we shall execute following sequence of steps.
- Read an image. This is our source.
- Define a low pass filter. In this example, our low pass filter is a 5x5 array with all ones and averaged.
- Apply convolution between source image and kernel using cv2.filter2D() function.
Python Program
import numpy as np
import cv2

#read image
img_src = cv2.imread('sample.jpg')

#prepare the 5x5 shaped filter
kernel = np.array([[1, 1, 1, 1, 1],
                   [1, 1, 1, 1, 1],
                   [1, 1, 1, 1, 1],
                   [1, 1, 1, 1, 1],
                   [1, 1, 1, 1, 1]])
kernel = kernel/sum(kernel)

#filter the source image
img_rst = cv2.filter2D(img_src,-1,kernel)

#save result image
cv2.imwrite('result.jpg',img_rst)
Output

The output image looks like all the grainy information is gone or like you captured an image that is out of focus.
2. OpenCV High Pass filter with 2D Convolution
In this example for High Pass Filter, we shall execute following sequence of steps.
- Read an image. This is our source.
- Define a high pass filter. In this example, our high pass filter is a 3x3 array, which is
kernelvariable in the below program. - Apply convolution between source image and kernel using cv2.filter2D() function.
Python Program
import numpy as np
import cv2

#read image
img_src = cv2.imread('sample.jpg')

#edge detection filter
kernel = np.array([[0.0, -1.0, 0.0],
                   [-1.0, 4.0, -1.0],
                   [0.0, -1.0, 0.0]])

kernel = kernel/(np.sum(kernel) if np.sum(kernel)!=0 else 1)

#filter the source image
img_rst = cv2.filter2D(img_src,-1,kernel)

#save result image
cv2.imwrite('result.jpg',img_rst)
Output

The output image looks like all the grainy information is preserved and the rest is gone.
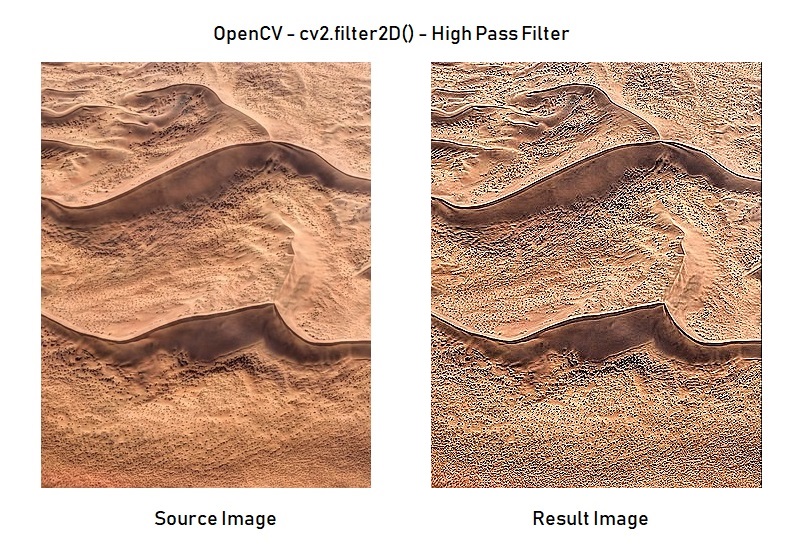
If you change the kernel array to the following, the color information is preserved with the high frequency pixel areas highlighted.
kernel = np.array([[0.0, -1.0, 0.0],
                   [-1.0, 5.0, -1.0],
                   [0.0, -1.0, 0.0]])
3. Custom Kernel
In this example, we will define a custom kernel, where it shall detect only the horizontal lines, if any.
Python Program
import numpy as np
import cv2

#read image
img_src = cv2.imread('sample.jpg')

#kernal sensitive to horizontal lines
kernel = np.array([[-1.0, -1.0],
                   [2.0, 2.0],
                   [-1.0, -1.0]])

kernel = kernel/(np.sum(kernel) if np.sum(kernel)!=0 else 1)

#filter the source image
img_rst = cv2.filter2D(img_src,-1,kernel)

#save result image
cv2.imwrite('result.jpg',img_rst)
Output

You can write your own custom kernel and detect a feature from the image.
Summary
In this tutorial of Python Examples, we learned how to filter an image or perform 2D convolution using cv2.filter2D() function.